Short Answer: Patient Links let your customers upload PD measurement photos directly to their Optogrid profile through a secure, unique web link. You generate the link, share it via email or text, and the patient submits photos through a simple form—eliminating email attachments, WhatsApp sharing, and manual file organization.
Optogrid’s Patient Links feature streamlines your remote measurement workflow by creating a direct, secure channel between you and your customers. Instead of juggling email attachments or WhatsApp messages, patients upload photos directly to their profile in your system, and you receive an automatic notification when photos are ready for measurement.
Why Use Patient Links Instead of Email or WhatsApp?
Traditional methods of collecting patient photos—email attachments, WhatsApp, or messaging apps—create workflow friction and organizational challenges. Patient Links solve these problems by providing a purpose-built solution for optical measurements.
Benefits of Patient Links
| Method | Organization | Security | Notification | File Size Limits | Professional |
|---|---|---|---|---|---|
| Patient Links | Auto-organized by patient | HTTPS encrypted | Automatic email | No limits | ✅ Yes |
| Manual filing | Varies | Manual check | 10-25MB typical | ⚠️ Moderate | |
| Mixed with messages | End-to-end encrypted | Chat notification | 16MB max | ❌ No | |
| Text/SMS | No organization | Not encrypted | Yes | Very limited | ❌ No |
Key advantages:
- No file size limits — Patients can upload high-resolution photos without compression
- Automatic organization — Photos are linked directly to the patient’s profile
- Email notifications — You’re alerted the moment photos are uploaded
- Professional experience — Branded upload page instead of personal messaging apps
- No lost messages — Photos don’t get buried in email threads or chat histories
- HIPAA considerations — More secure than unencrypted email (patient data stays in your system)
According to the American Optometric Association’s telehealth guidelines, maintaining organized, secure patient data is essential for remote optical services. Patient Links provide this structure automatically.
When to Use Patient Links for Remote PD Measurements
Patient Links are ideal for any situation where the patient cannot visit your location in person for measurement:
E-commerce and online orders:
- Customer ordering glasses online through your website
- Repeat customers who already have their prescription
- Lens replacement orders for existing frames
Remote consultations:
- Telehealth appointments for prescription verification
- Virtual frame fittings and consultations
- Post-pandemic flexible service options
Geographic convenience:
- Customers who live far from your location
- Busy professionals who can’t visit during business hours
- Follow-up measurements after an in-person visit
Workflow efficiency:
- Pre-appointment photo collection (patient submits before their visit)
- After-hours submissions (patient sends photos whenever convenient)
- Reduced in-office time (measurement prep done remotely)
When NOT to use Patient Links: If the patient is already in your office, use direct photo capture for faster workflow.
How to Generate and Share a Patient Link (Step-by-Step for Opticians)
Step 1: Navigate to Patient Profile
Log into Optogrid and open the patient’s profile. If this is a new customer, create their profile first by entering basic information (name, email, phone).
Step 2: Generate Patient Link
In the patient profile, click the “Get a patient link” button. Optogrid will generate a unique, secure URL for this specific patient.
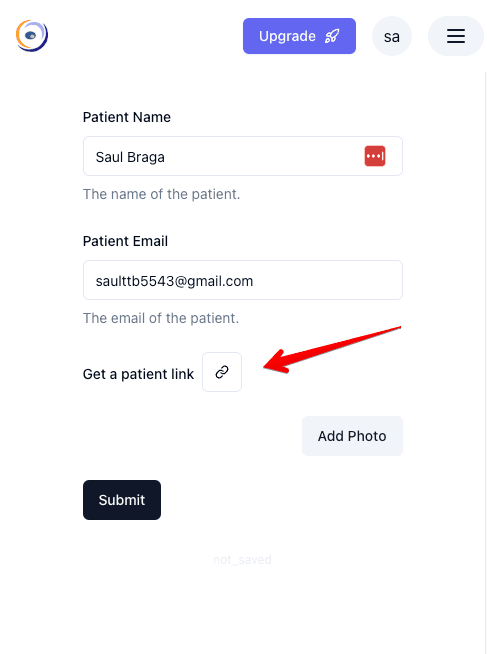
Behind the scenes: Each link is unique to the patient and their profile, ensuring photos are automatically associated with the correct customer.
Step 3: Copy the Link
Click the “Copy link” button to copy the URL to your clipboard.
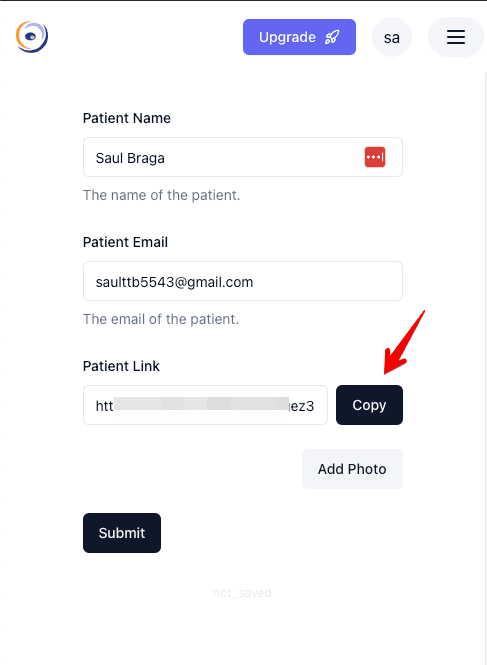
The link will look something like: https://app.optogrid.io/patient/abc123xyz
Step 4: Share the Link with Your Patient
Send the link to your patient using their preferred communication method:
Email (recommended):
Hi [Patient Name],

Please use the link below to upload your photos for PD measurement:
[paste link]
Instructions: 1. Click the link 2. Take two photos following the on-screen guide 3. Upload both photos 4. We’ll measure your PD and contact you within 24 hours Thank you! [Your Optical Shop Name]
Text message:
Hi [Name], please upload your PD photos here: [paste link]
Follow the on-screen instructions. We'll contact you once measured. - [Your Shop]
WhatsApp (for customer preference):
Use WhatsApp only to deliver the link, but have the patient use the link (not WhatsApp) for photo upload.
Step 5: Wait for Notification
When the patient completes their upload, you’ll receive an automatic email notification. No need to check manually—Optogrid alerts you the moment photos are ready.
Patient Experience: How Customers Submit Photos
From the patient’s perspective, the Patient Link process is simple and guided:
Step 1: Patient Clicks the Link
The patient receives your link and clicks it on their smartphone or computer. They’re taken to a clean, branded upload page.
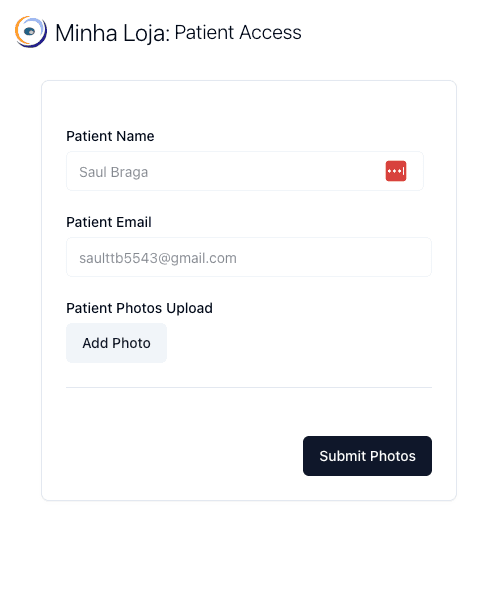
Step 2: On-Screen Instructions
The upload page displays clear instructions:
- What photos to take (frontal face photo, photo with reference object)
- How to position themselves (good lighting, remove glasses or wear them, etc.)
- Photo quality requirements
Step 3: Photo Upload
The patient selects or captures photos using:
- Mobile: Camera app or photo library
- Desktop: Webcam or upload from file
Step 4: Submission
Once both photos are uploaded, the patient clicks “Submit.” They receive a confirmation message, and you receive your email notification automatically.
Patient advantages:
- No app download required (works in web browser)
- Clear visual instructions
- Instant confirmation of successful upload
- Can complete at their convenience (no business hours restriction)
Security and Privacy Considerations
Patient Links are designed with data security in mind:
Unique, time-sensitive links:
- Each link is unique to one patient and one session
- Links can be set to expire after a certain period (optional)
- Links cannot be reused by unauthorized parties
HTTPS encryption:
- All uploads use encrypted HTTPS connections
- Photos are never transmitted in plain text
No public access:
- Links don’t expose patient information in the URL
- Photos are stored in your private Optogrid account, not public servers
Data privacy:
- Patient photos are associated with their profile only in your account
- Optogrid follows industry-standard data protection practices
- You maintain full control over patient data
HIPAA considerations (US customers):
While Optogrid is a measurement tool (not a medical records system), using Patient Links keeps patient photos within a controlled system rather than unencrypted email—an important consideration for practices concerned with patient privacy.
For more information on Optogrid’s data practices, visit our privacy policy.
How to Access and Measure Uploaded Patient Photos
Once the patient submits photos, the workflow is seamless:
Step 1: Receive Email Notification
Optogrid sends an automatic email notification when photos are uploaded. The email includes:
- Patient name
- Timestamp of upload
- Link to patient profile
Step 2: Open Patient Profile
Click the link in the notification email, or navigate to the patient’s profile manually in Optogrid.
Step 3: View Uploaded Photos
The photos will be available in the patient’s profile, ready for measurement. No downloading or file management needed—everything is already organized.
Step 4: Proceed with PD Measurement
Use Optogrid’s standard PD measurement workflow to measure:
- Single PD or Dual PD
- Segment height (SH) if needed
- Bridge Markers if patient is wearing frames
Step 5: Complete Order
Once measurements are taken, use them for lens ordering and contact the patient with their PD results or to complete their eyewear order.
Troubleshooting Common Patient Link Issues
Issue 1: Patient Says Link Doesn’t Work
Possible causes:
- Link was copied incorrectly (missing characters)
- Link expired (if expiration was set)
- Patient’s internet connection issues
Solutions:
- Resend the link, ensuring the full URL is copied
- Generate a new link if the old one expired
- Ask patient to try a different browser or device
- Verify link works by testing it yourself first
Issue 2: Photos Not Uploading
Possible causes:
- Photo file size too large (though Optogrid has high limits)
- Patient on slow internet connection
- Browser compatibility issue
- Wrong photo format
Solutions:
- Ask patient to compress photos slightly if very large (>50MB)
- Suggest patient use WiFi instead of mobile data
- Try a different browser (Chrome, Safari, Firefox)
- Ensure photos are in standard formats (JPG, PNG)
Issue 3: Didn’t Receive Notification Email
Possible causes:
- Email went to spam folder
- Email address incorrect in Optogrid settings
- Notification settings disabled
Solutions:
- Check spam/junk folder
- Verify your email address in Optogrid account settings
- Check notification preferences in settings
- Manually check patient profile (photos may be there even without notification)
Issue 4: Patient Uploaded Wrong Photos
Possible causes:
- Patient misunderstood instructions
- Uploaded selfies instead of measurement photos
- Photos don’t show reference object
Solutions:
- Review the photos and contact patient with specific feedback
- Generate a new Patient Link for resubmission
- Provide clearer instructions in your message when sharing the link
- Consider creating a quick reference guide for patients
Issue 5: Patient Concerned About Privacy
Possible causes:
- Patient unfamiliar with remote photo upload
- Concerned about data security
- Wants to know who has access to photos
Solutions:
- Explain that photos are stored securely in your private account
- Emphasize HTTPS encryption and unique links
- Reassure them photos are only used for PD measurement
- Offer alternative: in-person measurement if they prefer
Best Practices for Using Patient Links
For Opticians
- Add context when sharing links — Don’t just send the URL. Include brief instructions and what to expect.
- Set expectations — Tell patients when they’ll hear back (e.g., “We’ll measure your PD within 24 hours”).
- Test the patient experience — Go through the upload process yourself to understand what patients see.
- Create a standard message template — Save time by creating a reusable message template for link sharing.
- Follow up if no submission — If a patient doesn’t upload within 48 hours, send a friendly reminder.
- Verify photo quality before measuring — Quickly review uploaded photos to ensure they’re usable before beginning measurement.
- Keep patients informed — After measuring, send results and next steps promptly.
For Patient Instructions
Include these tips when sharing Patient Links:
- Use good lighting (natural light near a window is ideal)
- Hold the camera at eye level, not below or above
- Remove eyeglasses (unless measuring for lens replacement)
- Include a reference object (credit card, ruler) in the photo as instructed
- Take photos in landscape orientation if possible
- Ensure your full face is visible and in focus
Frequently Asked Questions About Patient Links
Can a patient upload photos multiple times using the same link?
Yes, patients can use the same link to upload additional photos if needed. However, new uploads will replace previous ones in the same session. If you want to keep both sets of photos, ask the patient to contact you before uploading again.
Do Patient Links expire?
Patient Links can be configured to expire after a set period (optional feature in settings). By default, links remain active until you manually deactivate them. This allows patients to submit at their convenience.
Can I revoke or deactivate a Patient Link?
Yes, you can deactivate a Patient Link from the patient’s profile at any time. Once deactivated, the link will no longer accept uploads.
How many photos can a patient upload per link?
Patients typically upload 2-3 photos per measurement session (frontal view, reference object view, and optionally a side view). The system supports multiple photo uploads in a single submission.
What if the patient doesn’t have a smartphone?
Patients can use the link on any device with a web browser and camera—smartphones, tablets, or computers with webcams. For patients without any camera-enabled device, you’ll need to arrange an in-person measurement.
Can I send the same link to multiple patients?
No. Each Patient Link is unique to one patient and their profile. This ensures photos are automatically organized correctly. Generate a separate link for each patient.
Will patients need to create an account or log in?
No. Patient Links work without requiring patients to create an Optogrid account or log in. They simply click the link, upload photos, and submit—no registration needed.
What happens to photos after I’ve measured the patient?
Photos remain in the patient’s profile for your records. You can delete them manually if needed, or they’ll be retained according to your data retention policies.
Can I customize the upload page with my branding?
Branding customization options may vary by Optogrid plan. Check your account settings or contact Optogrid support to inquire about white-label or branded upload pages.
Related Optogrid Features for Remote Workflow
Patient Links work seamlessly with other Optogrid features to create a complete remote measurement workflow:
- How to Measure PD, Dual PD, and SH with Optogrid — Complete measurement guide once photos are uploaded
- Bridge Markers — For accurate measurements when patients wear glasses in photos
- Custom Reference Registers — Save frequently-used reference objects for faster measurements
- About Optogrid — Learn more about our remote measurement technology

I am a seasoned software engineer with over two decades of experience and a deep-rooted background in the optical industry, thanks to a family business. Driven by a passion for developing impactful software solutions, I pride myself on being a dedicated problem solver who strives to transform challenges into opportunities for innovation.