
Short Answer: Bridge Markers (DBL) eliminate the need to manually guess the nose center line when measuring dual PD on patients wearing glasses. You mark the two inner edges of the frame bridge, and Optogrid automatically calculates the exact center between those points—improving measurement accuracy to within 0.5mm precision.
When a patient is wearing glasses in the uploaded photo, manually placing the vertical center line can be tricky. The Bridge Markers feature removes the guesswork by letting you mark the inner edges of the frame bridge. Optogrid then automatically calculates the exact center between those points, ensuring more accurate dual Pupillary Distance (PD) measurements.
Why Accurate Dual PD Measurement Matters
Pupillary Distance (PD) is one of the most critical measurements in optical dispensing. According to the American Academy of Ophthalmology, even a 2-3mm error in PD measurement can cause eye strain, headaches, and reduced visual acuity—especially in higher prescriptions or progressive lenses.
Dual PD measurements (measuring the distance from each pupil to the nose bridge separately) provide even greater precision than single PD, ensuring that each lens optical center aligns perfectly with the corresponding pupil. This is particularly important for:
- Asymmetric facial features — Many patients have slightly different left and right PD measurements
- Progressive and multifocal lenses — Require precise optical center positioning
- High prescriptions — Greater sensitivity to PD errors
- Frame-specific fitting — Ensures lenses sit correctly in the chosen frame
The American Optometric Association recommends measuring PD to within 1mm accuracy for optimal visual comfort. Digital tools like Optogrid achieve 0.5mm precision when used correctly.
When to Use Bridge Markers for PD Measurements
Bridge Markers are specifically designed for scenarios where the patient is wearing eyeglasses in the measurement photo. This feature is ideal when:
- Patient is already wearing frames — Remote measurements where removing glasses isn’t practical
- Measuring for lens replacement — Using the patient’s existing frames as the reference
- Frame-based measurements — When you’re using the frame width as your reference scale (instead of a ruler or credit card)
- Difficult center line placement — Patients with wide or flat nasal bridges where visual estimation is unreliable
- Quality control verification — Double-checking measurements that seem off
When NOT to use Bridge Markers: If the patient isn’t wearing glasses in the photo, use the standard nose center line tool instead.
How Bridge Markers Improve Accuracy vs Manual Center Line
Manual center line placement relies on visual estimation of the nose midpoint, which introduces human error. Bridge Markers use the actual physical geometry of the frame for a more objective reference point.
| Method | Accuracy | Consistency | Best For |
|---|---|---|---|
| Manual Center Line | ±1-2mm | Varies by technician | Patients not wearing frames |
| Bridge Markers (DBL) | ±0.5mm | Consistent (frame-based) | Patients wearing frames |
| Frame Width Reference | ±0.5mm | Most consistent | Frame replacement orders |
The key advantage: Bridge Markers eliminate the guesswork by using a fixed anatomical landmark (the frame bridge) rather than estimating an invisible midline on the patient’s nose.
How to Enable and Use Bridge Markers in Optogrid
Follow these steps to enable and use Bridge Markers for dual PD measurements:
Step 1: Open Frame Settings
Open the measurement toolbar in Optogrid and click the Frame button to access frame-specific measurement options.

Step 2: Enable “Patient Wearing Frames”
In the Frame dialog box, toggle the switch labeled Patient wearing frames to ON, then close the dialog. This tells Optogrid to expect frame-based markers instead of the standard nose center line.
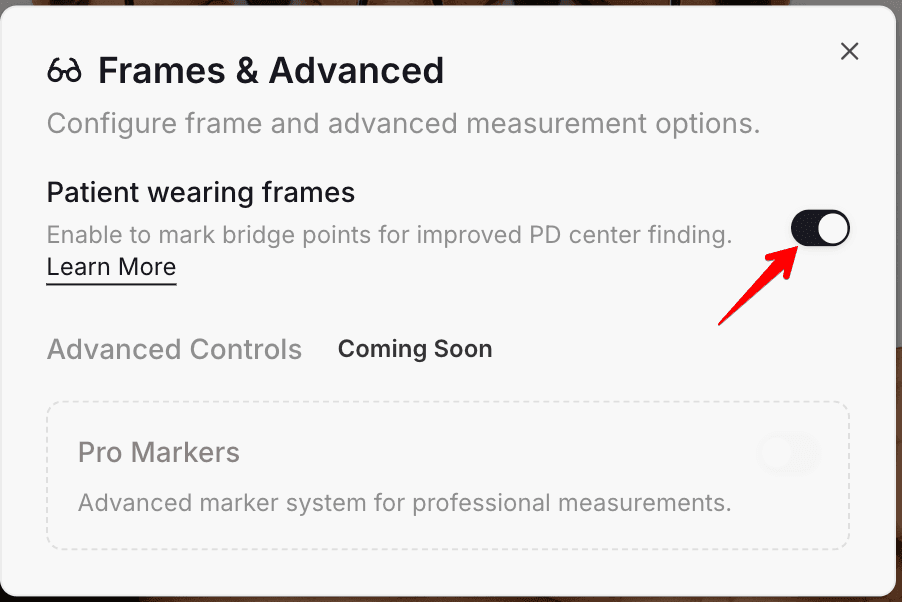
Important: Make sure the patient is actually wearing glasses in the photo before enabling this option.
Step 3: Bridge Points Button Appears
Once enabled, the standard Center button in your toolbar will automatically change to the Bridge points button. This indicates that Optogrid is now ready to accept bridge marker placement.

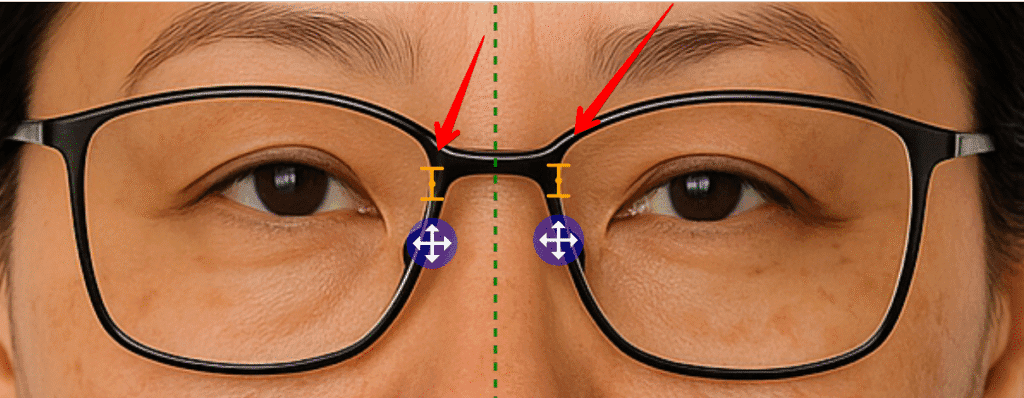
Step 4: Mark the Inner Bridge Edges
Click on the image to place two markers at the inner edges of the frame bridge—these are the points where the two lenses meet closest to the nose.
What to mark: The inside corners of the frame bridge (DBL measurement points), NOT the outer edges of the lenses.
Pro tip: Zoom in on the bridge area before placing markers for maximum precision. Use your mouse wheel or the zoom controls to get a close-up view.
Step 5: Automatic Center Line Calculation
Optogrid will automatically calculate and position the vertical center line exactly halfway between your two bridge markers. The center line will update in real-time as you place or adjust the markers.
✅ Result: Precise, frame-based center alignment with ±0.5mm accuracy—no guesswork required.
Using Bridge Markers with Frame Width Reference
Bridge Markers work seamlessly with Optogrid’s Custom Reference feature. If you select a reference that uses the frame width as the calibration scale, Bridge Markers will be enabled automatically.
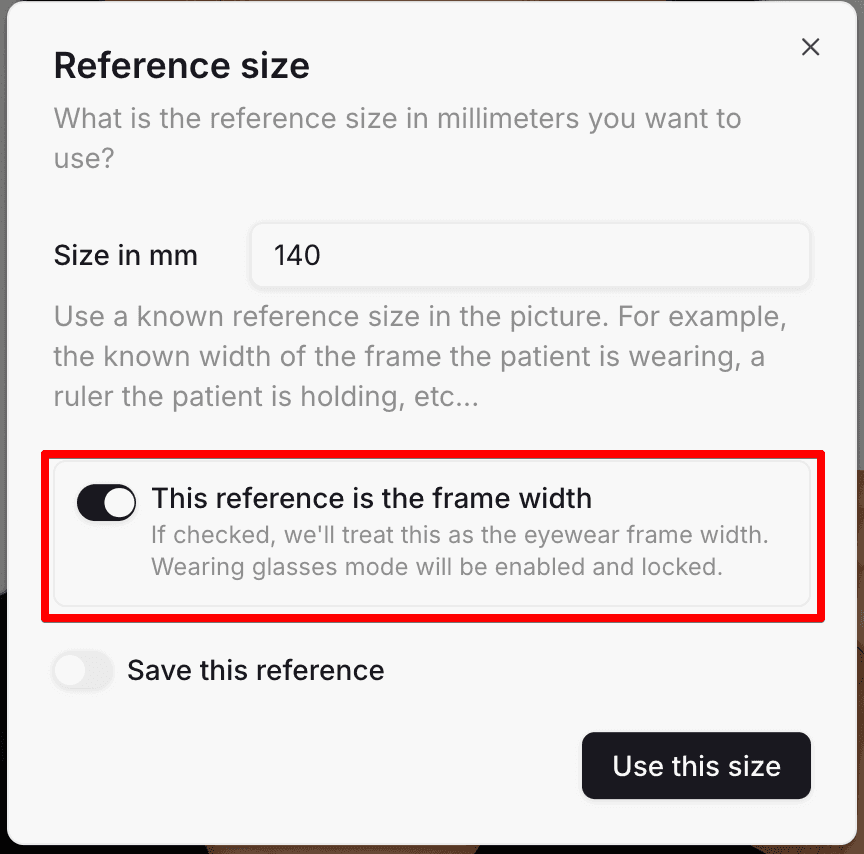
This dual frame-based approach provides maximum accuracy by ensuring:
- Consistent scale calibration — Frame width provides a known dimension for scale
- Aligned center line — Bridge markers use the same frame geometry for center calculation
- Reduced error propagation — Both measurements derive from the same physical object
When to use this method: Ideal for lens replacement orders where you have the exact frame dimensions from the manufacturer or can measure the frame directly.
Learn more about setting up custom references in our Custom Reference Registers guide.
Best Practices for Accurate Bridge Marker Placement
Follow these tips to ensure maximum accuracy when using Bridge Markers:
- Always zoom in before placing markers — Use maximum zoom on the bridge area for pixel-perfect placement. Small positioning errors can add up.
- Mark the true inner edges — Place markers at the innermost points where the two lenses meet, not on the frame rim or nose pads.
- Check for frame symmetry — If the frame appears tilted in the photo, the bridge markers may not reflect the true anatomical center. Before retaking the photo, try using Optogrid’s image rotation tool to correct minor tilt without asking the patient to reshoot.
- Verify marker placement — After placing both markers, zoom out to verify they look symmetrical. If one marker appears significantly higher or lower than the other, the frame may be tilted.
- Reposition if needed — Click again to move a marker if the placement looks off. Optogrid will recalculate the center line in real-time.
- Combine with frame width reference — For maximum accuracy, use Bridge Markers together with a frame width reference measurement when possible.
- Use good lighting — Ensure the bridge area is clearly visible in the photo. Shadows or glare can make precise marker placement difficult.
Common Mistakes When Placing Bridge Markers
Avoid these frequent errors that can reduce measurement accuracy:
Mistake 1: Marking the Outer Frame Edges
Wrong: Placing markers on the outer edges of the lenses or frame front.
Right: Place markers at the inner bridge points where the two lenses come closest together.
Mistake 2: Skipping the Zoom Step
Problem: Trying to place markers without zooming in reduces precision.
Solution: Always zoom in to at least 200% before placing markers.
Mistake 3: Using Bridge Markers When Patient Isn’t Wearing Frames
Problem: Bridge Markers is designed for patients wearing glasses. Using it on frameless photos won’t work.
Solution: Use the standard nose center line tool if no frames are present.
Mistake 4: Not Checking for Frame Tilt
Problem: If the frame is tilted in the photo, bridge markers will reflect the tilted position, not the true anatomical center.
Solution: Ask the patient to retake the photo with the frame level, or use the manual center line tool instead.
Mistake 5: Ignoring the Automatic Center Line
Problem: Manually adjusting the center line after Bridge Markers have calculated it.
Solution: Trust the automatic calculation—it’s more precise than manual adjustment. If it looks wrong, recheck your marker placement instead.
Frequently Asked Questions About Bridge Markers
What is DBL and why is it mentioned in the Bridge Markers name?
DBL stands for “Distance Between Lenses” — it’s the optical industry standard term for the bridge width of eyeglass frames. Bridge Markers use the DBL measurement points (the inner edges of the bridge) as the reference for center line calculation.
Can I use Bridge Markers if the patient is wearing sunglasses?
Yes, as long as the inner edges of the frame bridge are clearly visible in the photo. Dark lenses don’t affect marker placement since you’re marking the frame, not the lenses.
What if the frame has an unusual bridge design (keyhole, saddle, etc.)?
Bridge Markers work with any frame style as long as you can identify the two innermost points where the lenses are closest to each other. For keyhole bridges, mark the inner points of the keyhole cutout.
Do I need to disable Bridge Markers after using them?
No, but if your next measurement is on a patient NOT wearing frames, you’ll need to go back to Frame settings and toggle off “Patient wearing frames” to return to the standard center line tool.
Can I reposition bridge markers after placing them?
Yes. Simply click again on the image to place new markers. The center line will automatically recalculate based on the new marker positions.
How accurate are Bridge Markers compared to manual center line placement?
Bridge Markers provide ±0.5mm accuracy when placed correctly, compared to ±1-2mm for manual center line estimation. The improvement comes from using a fixed physical reference (the frame) instead of visual estimation.
Do Bridge Markers work with all frame materials (metal, plastic, rimless)?
Bridge Markers work best with full-rim frames (metal or plastic). For rimless or semi-rimless frames, the bridge may not be clearly visible, making manual center line placement more appropriate.
Can I use Bridge Markers for single PD measurement or only dual PD?
Bridge Markers are specifically designed for dual PD measurements because they establish the center line between the two pupils. For single PD, the center line calculation is still used, but it’s the total distance that matters, not the individual left/right measurements.
Related Optogrid Features
Bridge Markers is part of Optogrid’s comprehensive suite of measurement tools designed to improve accuracy and efficiency:
- How to Measure PD, Dual PD, and SH with Optogrid — Complete guide to all measurement types
- Custom Reference Registers — Save and reuse frame widths and calibration objects
- Patient Links — Let patients send measurement photos directly to you
- About Optogrid — Learn more about our virtual pupillometer technology

I am a seasoned software engineer with over two decades of experience and a deep-rooted background in the optical industry, thanks to a family business. Driven by a passion for developing impactful software solutions, I pride myself on being a dedicated problem solver who strives to transform challenges into opportunities for innovation.