Quick Answer: The image rotation tool lets you rotate patient photos in 90° steps for orientation fixes or in fine 0.5° increments for precise leveling. This ensures accurate PD and segment height measurements even when photos aren’t perfectly aligned, addressing the number one feature request from our community.
Image rotation was the most requested feature from our Optogrid community. The new rotation panel gives you complete control over photo orientation and alignment, ensuring every measurement is accurate. Whether you’re dealing with selfies from Patient Links, tilted camera angles, or photos where the head isn’t perfectly level, this tool brings convenience and precision to your measurement workflow.
Why Image Rotation Matters for Accurate Measurements
Photo alignment directly impacts measurement accuracy, particularly for segment height calculations. When a patient photo is tilted—even by a few degrees—the vertical and horizontal reference points shift, potentially introducing measurement errors.
The Impact of Misaligned Photos
Research on optical measurement accuracy demonstrates that angular deviations in reference images can produce systematic errors in pupillary distance and segment height calculations. According to optical measurement standards, maintaining proper horizontal alignment is critical for achieving measurement accuracy within ±0.5mm tolerance—the industry standard for optical dispensing.
Common problems from misaligned photos:
- Segment height errors — When the photo is tilted, the vertical measurement line doesn’t represent the true vertical axis, causing segment height miscalculation
- Reference point drift — Frame edges or calibration objects appear at incorrect angles, affecting scale calibration
- Asymmetric measurements — Tilt can make one side appear higher or lower than it actually is, creating false dual PD asymmetry
This is why our community identified image rotation as the top priority feature. Before this tool, users had to ask patients to retake photos, use external image editing software, or accept reduced measurement precision. Now you can fix alignment issues in seconds without leaving Optogrid.
What You Need Before Using the Rotation Tool
The rotation tool works seamlessly with your existing Optogrid measurement workflow. You’ll need:
- Active Optogrid account — Log in at app.optogrid.com
- Patient photo uploaded — Either uploaded manually in the measurement flow or submitted via Patient Links
- Supported image format — JPG, PNG, HEIC, or WebP (most common smartphone formats)
- Minimum image quality — At least 640×480 resolution; 1080p or higher recommended for best results
- File size — Up to 20MB per image (virtually all smartphone photos)
The rotation feature is available on all devices—desktop browsers, tablets, and mobile phones—with the same functionality across platforms.
How to Rotate Patient Photos in Optogrid
Follow these steps to rotate and align patient photos for accurate measurements:
Step 1: Access Your Measurement
Log in to Optogrid and navigate to the patient case you want to measure. Click Add photo to upload a new image, or select an existing photo if the patient has already submitted one through Patient Links.
Step 2: Open the Rotation Panel
Once the photo appears in the measurement interface, look for the adjustment icon (settings/gear icon) located next to the Calculate button. Tap this icon to open the rotation and adjustment panel.

Adjustment button
Step 3: Choose Your Rotation Method
The adjustment panel contains two rotation controls:
- 90° rotation buttons (−90° and +90°) — For photos taken in the wrong orientation (sideways or upside down)
- Fine adjustment slider — For precise 0.5° increments to level tilted photos
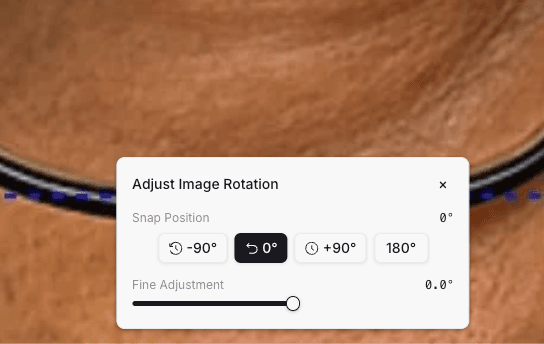
Adjustment panel
Step 4: Use the Baseline Guide for Alignment
The horizontal baseline guide appears as a reference line across the center of the photo. This guide helps you verify proper alignment:
- For frontal photos: Align the bottom edge of the eyeglass frames parallel to the baseline
- For photos without glasses: Align the line connecting both pupils horizontally to the baseline
- Visual cue: When properly aligned, both temples of the frame should touch or run parallel to the baseline
Rotate the image using the slider until the frame or pupils align perfectly with the baseline. The rotation angle displays in real-time as you adjust.
Step 5: Verify Alignment
Before proceeding to measurement, double-check:
- Frame bottom edges are level with the baseline
- Both sides of the face appear symmetrical relative to the center vertical line
- Reference objects (if using Custom References) are oriented correctly
Step 6: Proceed with Normal Measurement
Once the photo is aligned, close the adjustment panel and continue your measurement workflow:
- Mark your reference points (frame width, ruler, or custom reference object)
- Place pupil markers or Bridge Markers for dual PD
- Click Calculate to obtain PD, Dual PD, or segment height measurements
The system automatically applies the rotation transformation to your measurements, maintaining accuracy regardless of the rotation angle applied.
When to Use 90° Rotation vs Fine 0.5° Adjustment
Understanding which rotation method to use saves time and ensures the best results. Here’s when to use each approach:
Use 90° Rotation For
Orientation problems:
- Patient took a selfie in landscape mode but uploaded it as portrait (or vice versa)
- Photos submitted through Patient Links from mobile devices with incorrect EXIF orientation
- Images imported from other systems or edited externally
- Scanned photos that were placed incorrectly on the scanner
How to identify: The face appears sideways or upside down. This is immediately obvious—you’ll need to tilt your head to view the photo properly.
Solution: Use the +90° or −90° buttons to rotate in 90-degree increments until the face is upright. You may need to click multiple times (e.g., +90° twice = 180° flip).
Use Fine 0.5° Adjustment For
Alignment problems:
- Patient’s head is tilted slightly in the photo
- Camera was held at an angle when capturing the image
- Frame is not perfectly horizontal due to how patient was sitting
- Small angular deviations affecting segment height accuracy
How to identify: The face is upright, but the eyeglass frames or pupils aren’t perfectly level with the horizontal baseline. One side appears slightly higher than the other.
Solution: Use the fine adjustment slider to rotate in 0.5° increments. Watch the baseline guide and adjust until the frame bottom edges run parallel to the baseline. Most alignment fixes require between 1° and 5° of rotation.
Decision Tree: Which Method?
| Photo Issue | Detection | Method | Expected Range |
|---|---|---|---|
| Face is sideways/upside down | Obvious – can’t view normally | 90° buttons | 90°, 180°, or 270° |
| Head tilt (mild) | Frame bottom edges slightly off-horizontal | Fine adjustment | 1° to 5° |
| Head tilt (severe) | One shoulder much higher than the other | Fine adjustment | 5° to 10° |
| Camera angle problem | Frame appears level but face seems rotated | Fine adjustment | 2° to 8° |
Best Practices for Photo Alignment and Rotation
Before Rotation
- Center the face first — Use pan/zoom controls to position the patient’s face in the center of the frame before beginning rotation adjustments
- Check photo quality — If the image is very blurry, poorly lit, or low resolution, rotation won’t fix underlying quality issues. Consider requesting a new photo
- Assess whether rotation is necessary — Don’t over-rotate. If the photo is within 1-2° of level, the measurement impact is negligible
During Rotation
- Use the baseline guide actively — This horizontal reference line is your primary alignment tool. Watch how frame edges or pupil lines relate to this baseline as you rotate
- Make small adjustments — When using fine adjustment, move in 0.5° to 1° increments rather than large sweeping rotations. This gives you better control
- Watch for reference object alignment — If you’re using a ruler or Custom Reference object, ensure it remains properly oriented after rotation
After Rotation
- Verify before calculating — Take 3 seconds to confirm the alignment looks correct before placing measurement markers
- Avoid excessive rotation — Rotating more than 15° may indicate the photo quality is too poor for accurate measurement. Consider requesting a retake
- Document edge cases — If you frequently need large rotation angles for a specific patient or photo source, investigate the root cause (camera settings, patient instructions, etc.)
Team Training Recommendations
- Create rotation examples — Save before/after screenshots showing proper baseline alignment to train new staff
- Set quality standards — Define your shop’s tolerance (e.g., “request retake if rotation needed exceeds 10°”)
- Update Patient Link instructions — Include guidance in your patient photo instructions to hold the camera level and face forward
Common Photo Alignment Issues and How to Fix Them
| Problem | How to Detect | Fix | Prevention |
|---|---|---|---|
| Head tilt | Patient’s head is tilted; one shoulder higher than the other | Use fine adjustment (2-8°) to level the frame bottom edges | Instruct patients to keep shoulders level and face camera straight |
| Camera angle | Camera was held at an angle; frame appears skewed | Use fine adjustment (3-10°) until baseline aligns with frame | Add “hold phone level” instruction to Patient Links |
| Wrong orientation | Photo is sideways or upside down | Use 90° buttons to rotate in 90° increments | Ensure mobile device EXIF orientation data is preserved during upload |
| Frame not level on face | Patient’s glasses are crooked on their face | ❌ Rotation alone won’t fix this—request photo retake | Ask patients to ensure glasses are positioned properly before photo |
| Severe head angle | Face is turned significantly left or right | ❌ Rotation won’t correct perspective distortion—request frontal photo retake | Emphasize “face the camera directly” in instructions |
Important distinction: The rotation tool fixes photo tilt (camera angle issues). It cannot fix perspective problems (patient not facing camera) or frame positioning issues (glasses crooked on the patient’s face). In those cases, request a new photo.
Real-World Use Cases for the Rotation Tool
Use Case 1: Patient Link Selfies
Scenario: Customer receives a Patient Link and takes a selfie using their smartphone’s front camera. Many users naturally tilt their head or hold the phone at an angle.
Solution: When the photo uploads to Optogrid, use fine adjustment (typically 2-5°) to level the frame. The customer doesn’t need to retake the photo, saving time for both of you.
Benefit: Faster turnaround on remote measurements; improved customer experience.
Use Case 2: Photos from Family Members
Scenario: A family member helps an elderly patient take a photo at home. The helper isn’t familiar with proper camera positioning and holds the phone at an angle.
Solution: Rotate 3-8° to correct the camera angle rather than requesting a new photo and explaining proper technique to the helper.
Benefit: Reduces back-and-forth communication; gets measurements faster.
Use Case 3: Archived Photos
Scenario: Using an older photo from patient records that was scanned or imported from another system with incorrect orientation.
Solution: Use 90° rotation buttons to correct orientation, then fine adjustment if needed.
Benefit: Enables measurement on existing photos without patient involvement.
Use Case 4: Pediatric Measurements
Scenario: Children often can’t stay perfectly still, resulting in photos where the head is tilted or the child is looking slightly off-angle.
Solution: Fine adjustment (2-6°) to optimize alignment for the available photo quality without requiring multiple photo sessions.
Benefit: Reduces stress on child and parent; achieves usable measurements from imperfect photos.
Troubleshooting Rotation Problems
Problem: Rotation Button Doesn’t Appear
Possible causes:
- Photo not fully loaded yet—wait 2-3 seconds after upload
- Browser compatibility issue—ensure you’re using a modern browser (Chrome, Firefox, Safari, Edge)
- Cached page data—refresh the browser page (Ctrl+R or Cmd+R)
Solution: Refresh the page and reload the measurement interface. If the issue persists, try a different browser or clear your browser cache.
Problem: Slider Doesn’t Respond
Possible causes:
- Touch/click not registering on the slider control
- JavaScript error in browser console
- Mobile device touch sensitivity
Solution: Try using the arrow buttons next to the slider instead. On mobile, ensure you’re tapping directly on the slider handle. If still unresponsive, contact Optogrid support.
Problem: Can’t Achieve Precise Alignment
Possible causes:
- Photo quality is too low for precise alignment
- Frame itself is crooked on patient’s face (rotation can’t fix this)
- Patient’s head position creates perspective distortion
Solution: First verify you’re using the baseline guide correctly. If the frame edges still won’t align perfectly with the baseline despite rotation, assess whether the issue is photo tilt (fixable) or frame positioning on face (requires retake). If alignment remains within 2-3° after best effort, proceed with measurement—the impact is minimal.
Problem: Photo Looks Distorted After Rotation
Possible causes:
- Excessive rotation angle (>15°) applied
- Low-resolution source image showing pixelation when rotated
- Browser rendering artifact
Solution: Rotation should not distort the image. If you see distortion, reduce the rotation angle or refresh the page. If distortion appears even with small rotations, the source image may be very low resolution—request a higher quality photo from the patient.
Problem: Rotation Resets When I Leave the Page
Expected behavior: Rotation adjustments are applied to the measurement session but don’t permanently modify the original uploaded image. If you navigate away and return, you may need to re-apply rotation.
Solution: Complete your measurement in the same session after rotating. If you need to save the rotated version, complete the measurement first—the calculated results include the rotation transformation.
Integration with Other Optogrid Features
The rotation tool works seamlessly with other Optogrid measurement features:
Patient Links Workflow
When patients submit photos through Patient Links, the rotation tool lets you fix any orientation or alignment issues without asking them to resubmit. This is especially valuable for remote measurements where communication delays can slow your workflow.
Custom References
If you’re using Custom References with saved frame widths or calibration objects, apply rotation before marking reference points. This ensures the reference object is properly oriented and calibration remains accurate.
Bridge Markers for Dual PD
When using Bridge Markers to measure dual PD, proper photo alignment is critical. Rotate the image first so the frame bridge is perfectly horizontal, then place your bridge markers. This ensures the automatically calculated center line between markers is truly vertical.
Frequently Asked Questions (FAQ)
Does rotation reduce the photo resolution?
No. The resolution is preserved. Optogrid applies a mathematical transformation to rotate the image without resampling or quality loss. The pixel dimensions remain the same.
Does the feature work on mobile devices?
Yes. On smartphones and tablets, the same rotation icon opens the adjustment panel with full functionality. The touch interface works identically to desktop, with the slider responding to finger gestures.
Is the original image modified?
No. Only the on-screen view is rotated for measurement purposes. The original uploaded file remains intact in your system. If you download the original later, it will be in its original orientation.
Does rotation interfere with measurement calculations?
No. The system automatically adjusts all measurement coordinates to account for the applied rotation before calculating PD, dual PD, or segment height. Accuracy is maintained regardless of rotation angle.
What’s the maximum rotation angle I can apply?
You can rotate the image a full 360° using the 90° buttons, and up to ±15° using the fine adjustment slider. However, if you need more than 10-15° of rotation, this typically indicates a photo quality issue that may benefit from retaking the image.
Can I rotate the image after marking reference points?
Yes, but it’s better to rotate first. If you rotate after placing markers, the system maintains the marker positions relative to the image. However, for best workflow efficiency, align the photo before marking reference points.
How do I know when the photo is perfectly aligned?
Use the horizontal baseline guide as your reference. When the bottom edges of the eyeglass frames run parallel to this baseline—with both left and right frame edges touching or equidistant from the line—the photo is properly aligned. For photos without glasses, align the imaginary line connecting both pupils to the baseline.
What should I do if the rotation slider doesn’t appear?
First, ensure the photo has fully loaded (wait 2-3 seconds after upload). Refresh your browser page. If the adjustment icon still doesn’t appear, try a different browser or clear your browser cache. Contact Optogrid support if the issue persists.
Conclusion
The image rotation tool brings convenience, precision, and flexibility to your PD measurement workflow. By addressing the number one feature request from our community, we’ve eliminated the need for external image editing, reduced the need for photo retakes, and empowered you to achieve accurate measurements even when photos aren’t perfectly aligned.
Try the rotation tool on your next measurement and experience the difference. Whether you’re working with Patient Link submissions, archived photos, or any image that needs alignment correction, this feature ensures you can deliver accurate measurements every time.
We’re committed to continuously improving Optogrid based on your feedback. If you have suggestions for enhancing the rotation tool or other features, contact our support team—your input shapes our development roadmap.

I am a seasoned software engineer with over two decades of experience and a deep-rooted background in the optical industry, thanks to a family business. Driven by a passion for developing impactful software solutions, I pride myself on being a dedicated problem solver who strives to transform challenges into opportunities for innovation.