
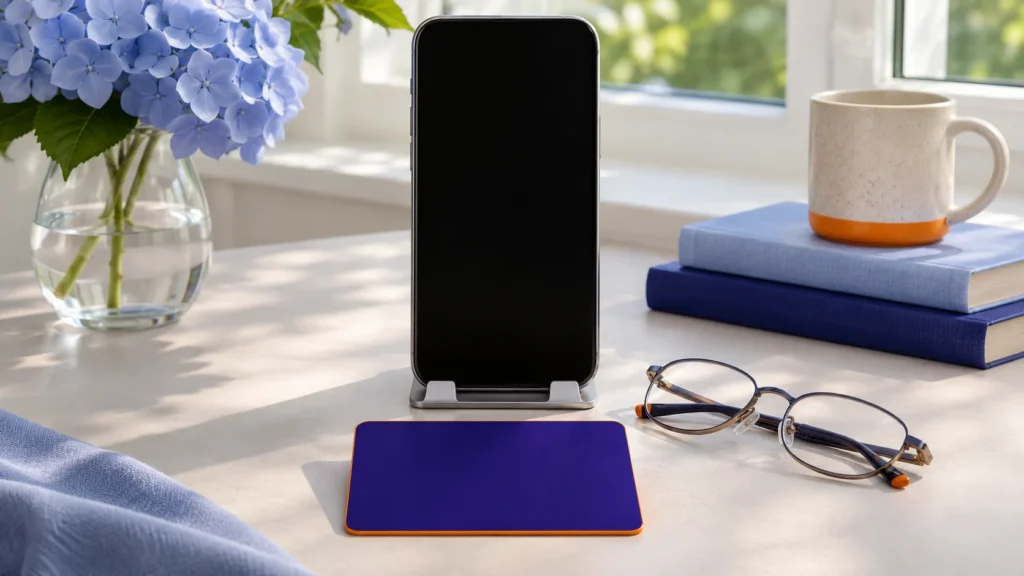
Your optician or online eyewear store asked for a photo to measure your pupillary distance (PD), the gap between your pupils that decides where the lenses sit. A good photo takes about a minute. Run through this list before you press the button.
- Glasses off.
- Facing a window or soft light, nothing bright behind you.
- Card horizontal, flat against your face, top edge just under your nose, both ends visible.
- Phone upright, lens at eye level.
- A helper about 1 m (3 ft) away, or your arm fully extended if you are alone. Never closer.
- Head straight and level, eyes open, looking into the lens.
- Hold still and take the photo.
What you need
- A standard-size card: a bank card, a debit card or many ID cards. These share one size, 85.60 by 53.98 millimetres, set by the ISO/IEC 7810 ID-1 format (summary of the standard). Only the card’s outline matters, so you can cover the numbers with a strip of paper, as long as both short ends stay visible.
- A phone, a window or a soft lamp, and a helper if you can find one.
The card works as a ruler of known width, so it and your pupils must be at the same scale. That is the reason behind most rules below.
Hold the card flat under your nose and keep your head straight
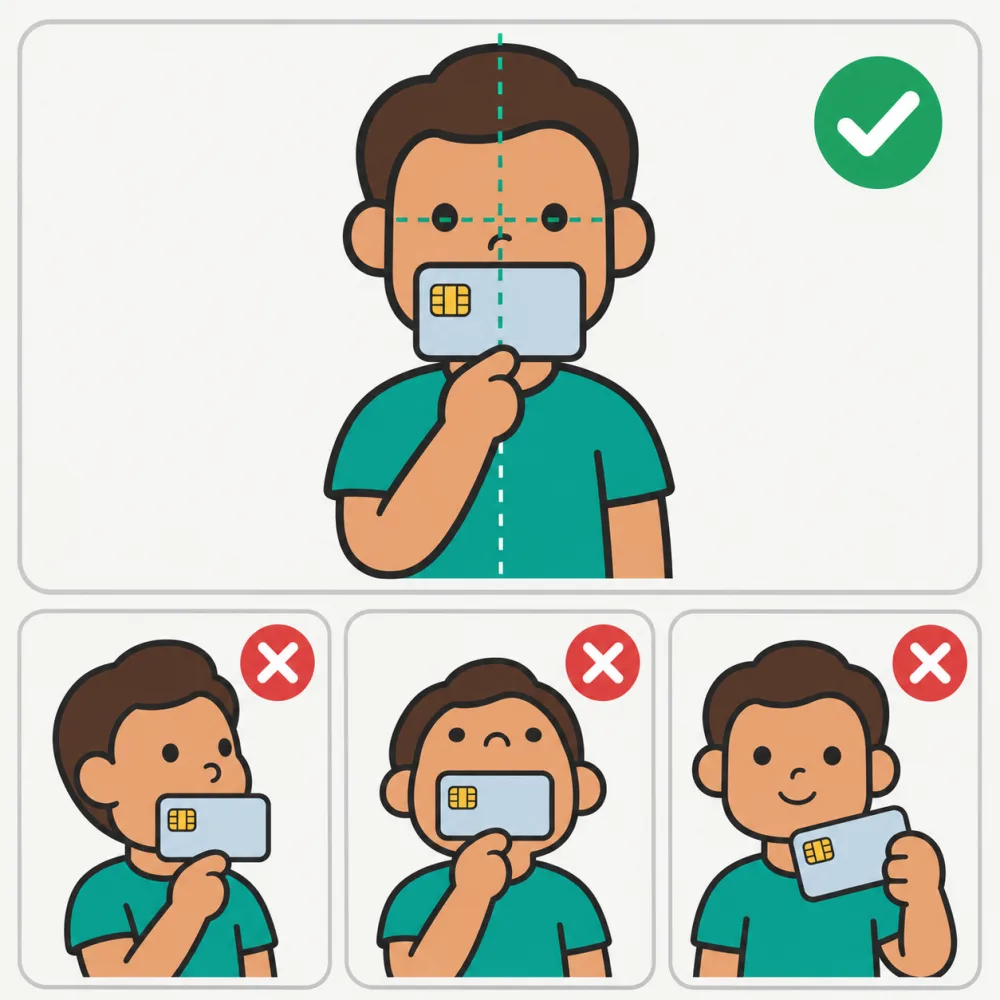
Look straight into the camera. Hold a card flat against your face, just under your nose, with the whole card visible.
Hold the card horizontally, with its top edge just under your nose, covering your mouth. Both short ends must be fully visible, because those two edges are what get measured. Your fingers can hold the bottom edge, but keep them off the ends.
Press the card against your face. A card held out in front of you sits closer to the camera than your eyes, looks bigger, and makes your PD come out too small.
Keep your head level: do not turn it, tip it back or lean. A head turned about 10 degrees can shift the result by about 1 mm.
Put the camera at eye level
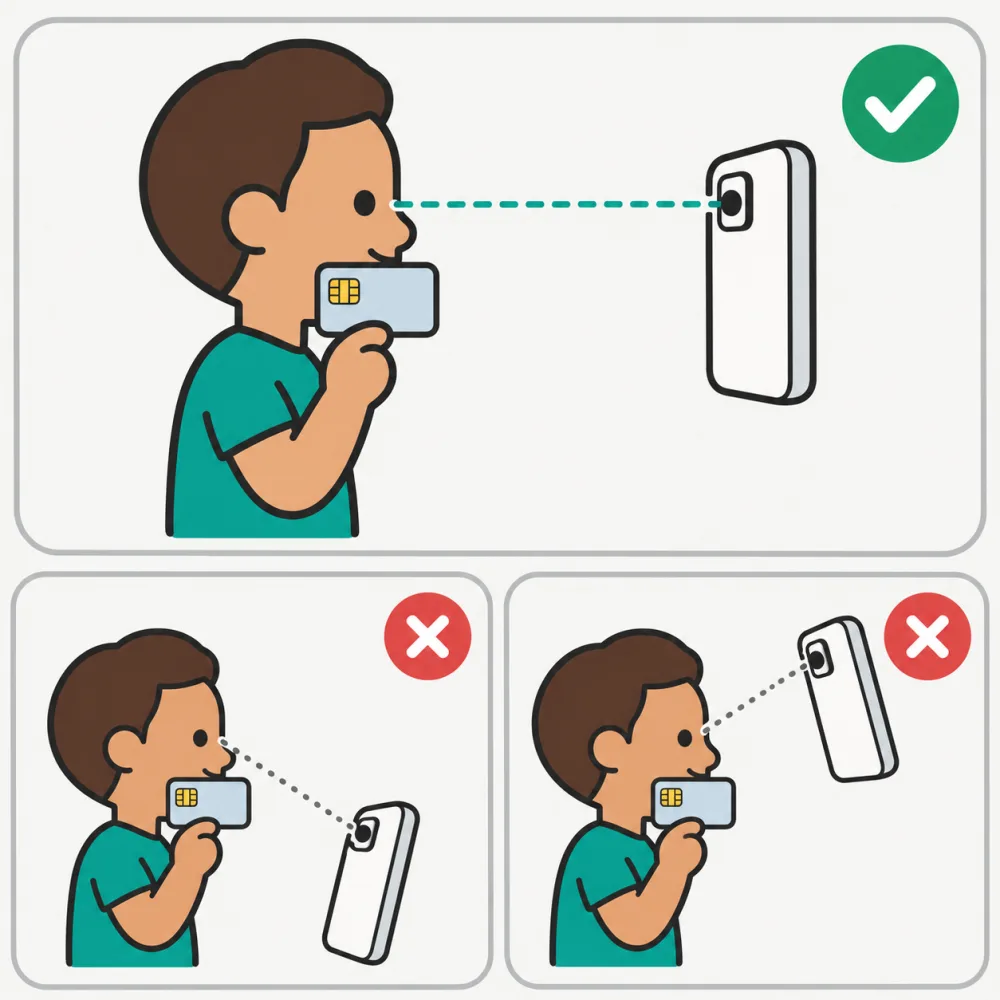
Keep the camera at eye level and hold the phone upright.
Hold the phone upright (portrait), with the camera lens level with your eyes and pointing straight at your face. A phone held low and tilted up, or high and tilted down, makes a level head look tilted in the photo. Move the phone, not your head.
Stay at full arm’s length or farther
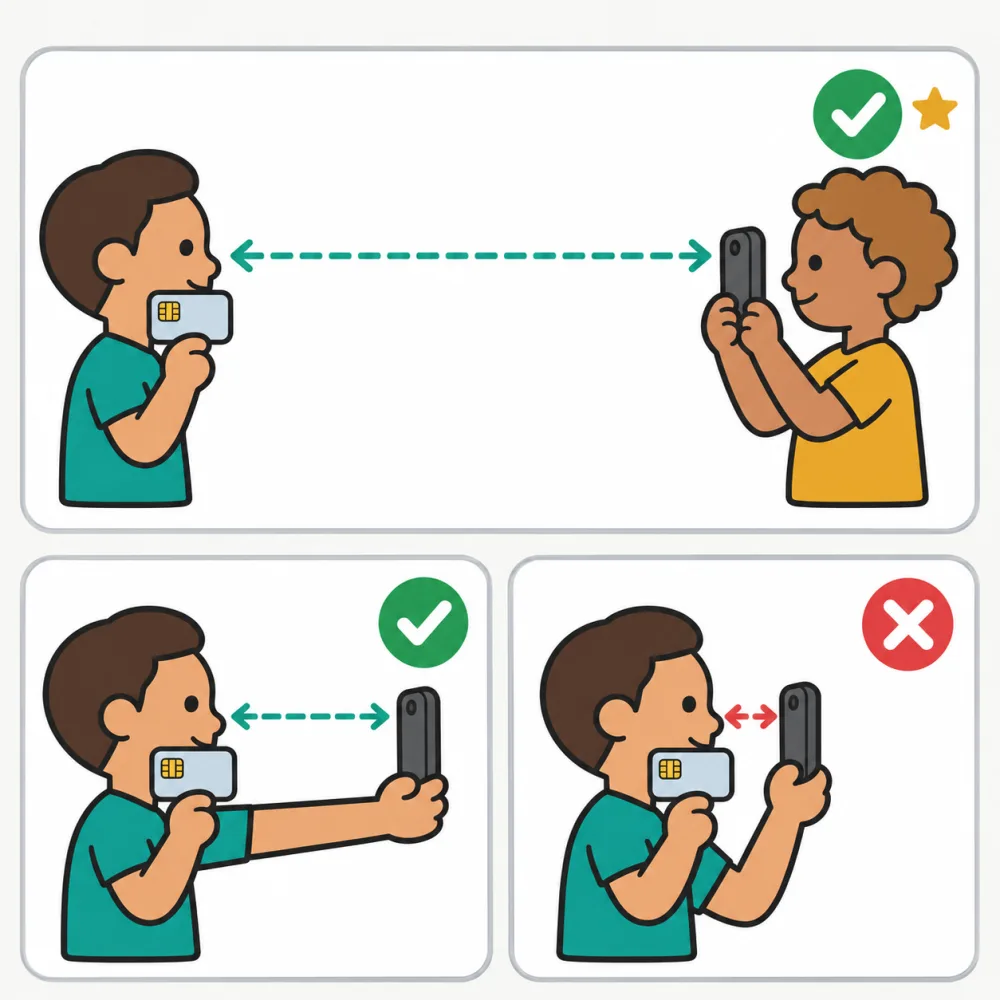
Best: ask someone to take the photo from about 1 m (3 ft) away. Alone? Hold the phone at full arm’s length. Never hold it any closer.
The best photo is taken by a helper from about 1 m away. Alone, hold the phone at full arm’s length. Never closer than that.
Up close, wide-angle phone cameras exaggerate the middle of the face, your eyes turn inward, and the card, slightly in front of your pupils, looks bigger. Distance reduces all three. If your face does not fill the frame, that is fine.
Face a window or a soft lamp
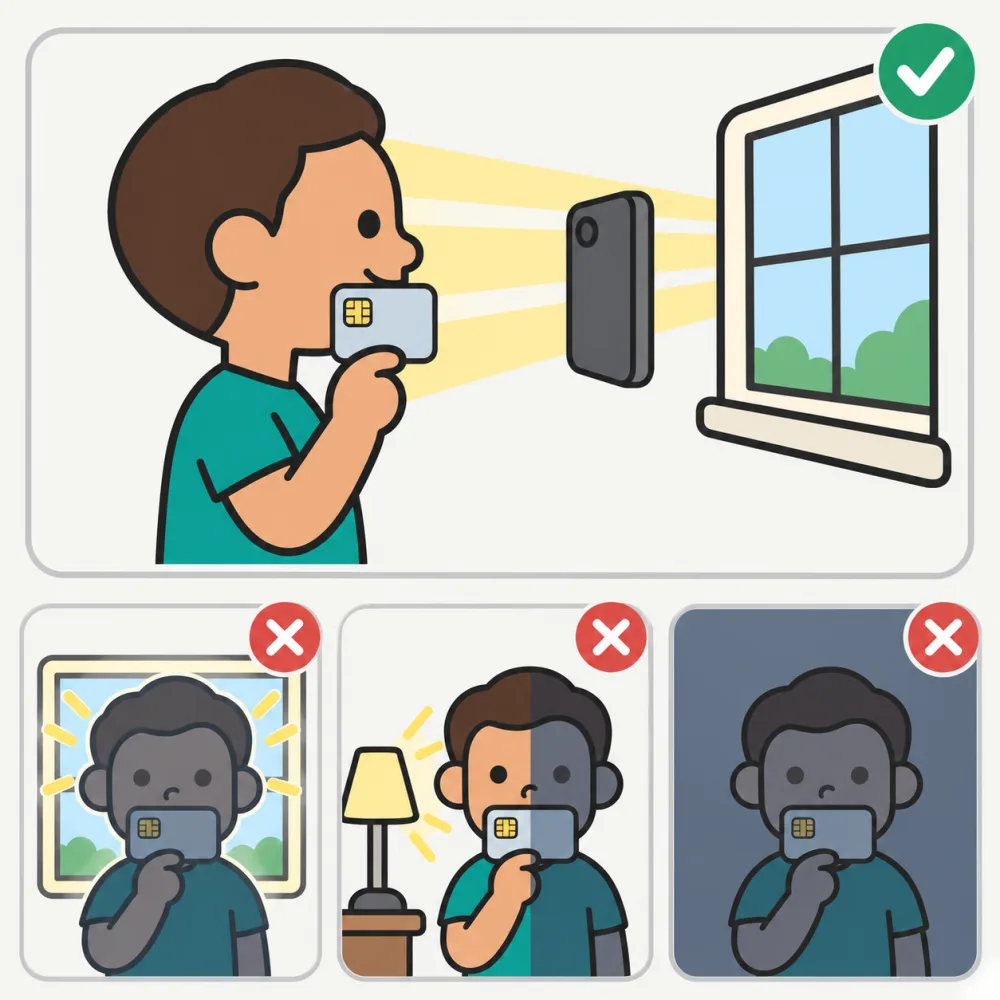
Face a window or a soft light. Avoid light behind you or from one side.
Bright, even light lets your pupils show against the colored part of your eye (the iris). With dark eyes the edge is hard to see in poor light.
- Window or bright wall behind you: your face turns into a silhouette.
- Strong light from one side: half your face falls into shadow, often hiding a pupil.
- A dark room: the photo gets grainy and soft.
Eyes open, glasses off, hold still
- Eyes open, looking into the lens, not at the screen and not at the person holding the phone. On a selfie the lens sits above the screen, so check where you are looking.
- Glasses off. Lenses shift and magnify where the pupils appear, and frames or reflections can hide them. This guide covers the no-glasses, card photo.
- Hold still. A blurry pupil cannot be placed precisely. Wipe the lens, tap your face to focus if your phone allows it, and keep steady as you press.
Taking the photo with a helper or alone
With a helper (best). The helper stands about 1 m away with the phone upright, using the back camera, lens at your eye level. Look into the lens, not at the helper.
Alone. Use the front camera, arm fully extended straight ahead, phone at eye level. Look into the lens, not at the screen.
Your optician or store reviews the photo and may ask for a new one. That is normal.
For opticians selling online: how to use this page
Send this page’s link with your Patient Links message, or link it from your store’s PD instructions. When a photo is not usable, point the customer to the matching section:
| What was wrong with the photo | Send this section |
|---|---|
| Bad lighting | Face a window or a soft lamp |
| Reference not visible | Hold the card flat under your nose |
| Eyes closed | Eyes open, glasses off, hold still |
| Photo blurry | Eyes open, glasses off, hold still |
| Face not centered | Hold the card flat under your nose, and Stay at full arm’s length (a face cut off by the frame is the problem, not one off to the side) |
| Wrong angle | Hold the card flat under your nose, and Put the camera at eye level |
Check each photo before you measure it. Problems with the light or the card usually only show up when someone looks at it.
The next step depends on where the photo came from:
- Patient Link: generate a new link and add the fix to your message.
- WooCommerce order: use Request Retake, or request a new photo from the order. The customer gets an email with a re-upload link. Any note you type does not go into that email, so add this guide to your store where they will see it.
You can straighten a slightly tilted photo before you measure the photo in Optogrid. More on the setup: remote PD measurement and the WooCommerce plugin.
Frequently Asked Questions
Does it have to be a credit card?
No. Any card of the standard size works: a bank card, a debit card or many ID cards. They share the ISO/IEC 7810 ID-1 size, 85.60 by 53.98 millimetres.
Do I have to show the card numbers?
No. Only the card’s outline is used. Cover the numbers with a strip of paper and keep both short ends visible.
Do I take my glasses off?
Yes. Lenses shift and magnify where the pupils appear, and frames or reflections can hide them. Take them off for this photo.
Why can’t I hold the phone closer?
Up close, the card looks bigger against your pupils, your eyes turn inward, and a wide-angle lens distorts the face. A helper at about 1 m gives the best result.
Can I take the photo alone?
Yes. Use the front camera, arm fully extended, phone upright at eye level, and look into the lens.
My eyes are very dark. Does it matter?
Good light matters more. Pupils are found against the iris, and in poor light a dark iris and pupil blend together. Face a window or a soft lamp.
Does my face have to be centered?
No. Your whole face and both ends of the card must be inside the frame, but the face can sit off to one side.
I grew up inside an optical shop. My mother likes to tell how, as a kid, I would watch eyeglasses being assembled, play with the tools, and draw on the back of service order slips. The family business taught me early what a precise measurement and work done right are worth.
I went on to spend more than twenty years as a software engineer, always keeping an eye on the optical world. Optogrid was born where the two meet: digital measurement technology (pupillary distance and fitting heights) built by someone who knows the dispensing counter from the inside.